Paw Patrol Coloring Pages PDF: A Comprehensive Guide (Updated March 31, 2026)
Discover a world of vibrant fun with readily available Paw Patrol coloring pages in convenient PDF format, perfect for creative kids and playful learning experiences!
What is Paw Patrol and Why is it Popular?
Paw Patrol is a hugely popular Canadian animated children’s television series created by Keith Chapman. The show centers around Ryder, a tech-savvy boy, who leads a team of search and rescue dogs – Chase, Marshall, Skye, Rubble, Zuma, and Rocky – each with unique skills and vehicles.
Its popularity stems from several factors. The series promotes teamwork, problem-solving, and community service, offering positive role models for young viewers. The adorable characters, exciting rescue missions, and vibrant animation capture children’s imaginations.
Paw Patrol’s appeal extends beyond the screen, encompassing a vast range of merchandise, including toys, clothing, and, importantly, coloring pages. These coloring pages allow children to further engage with the characters and storylines, fostering creativity and providing a fun, offline activity. The simple designs are perfect for little hands, making it accessible for a wide age range.
The Benefits of Coloring for Children
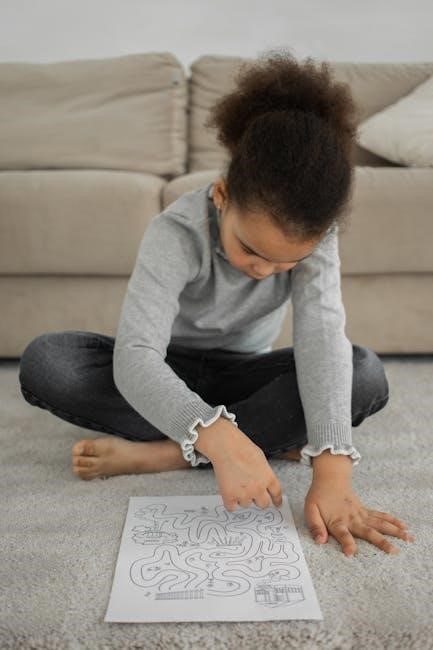
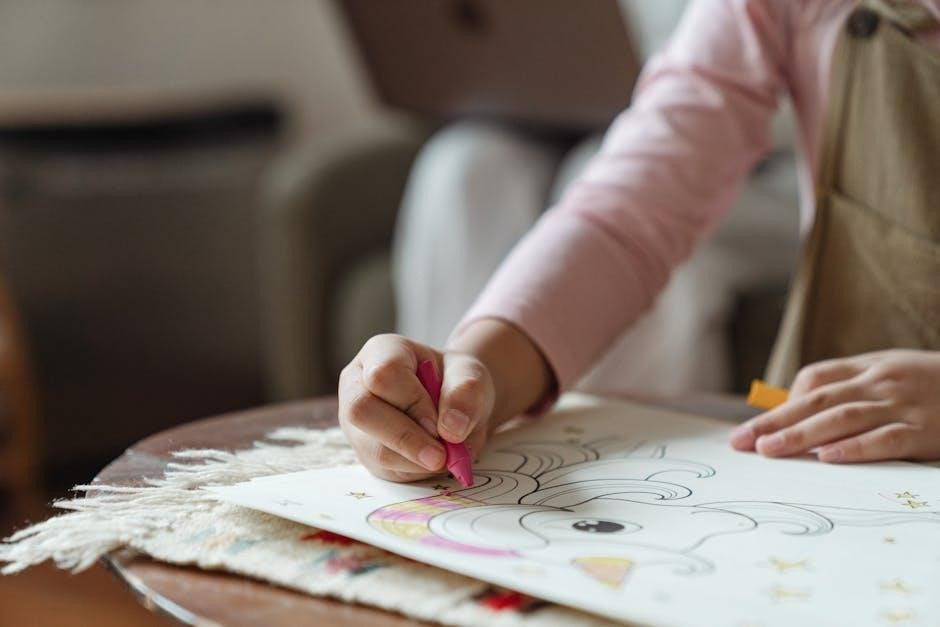
Coloring, especially with beloved characters like those from Paw Patrol, offers a wealth of developmental benefits for children. It significantly enhances fine motor skills, as children practice controlling crayons, markers, or pencils within defined lines. This strengthens hand-eye coordination, crucial for writing and other tasks.
Beyond physical skills, coloring nurtures creativity and self-expression. Choosing colors and bringing Paw Patrol scenes to life encourages imagination and artistic exploration. It also provides a calming and therapeutic outlet, reducing stress and anxiety.
Furthermore, Paw Patrol coloring pages can aid in color recognition and learning. They can even be used to introduce basic counting skills, identifying how many pups are on a page. The act of completing a coloring page fosters a sense of accomplishment and boosts self-esteem.
Finding Paw Patrol Coloring Pages Online
Explore numerous websites offering free and premium Paw Patrol coloring pages in easily downloadable PDF formats, catering to every young fan’s artistic desires!
Free Printable Options: A Detailed Overview
Numerous websites provide a fantastic selection of free, printable Paw Patrol coloring pages, readily available as PDF downloads. Sites like Simply Love Coloring and Just Color Kids offer extensive collections, featuring all the beloved characters – Chase, Marshall, Skye, and more – engaged in exciting rescue missions and everyday adventures in Adventure Bay.
These free resources are ideal for casual coloring fun, rainy day activities, or supplementing educational lessons. The PDFs are generally easy to download and print, requiring only a standard printer and paper. Many sites categorize pages by character or theme, simplifying the search process.
However, be mindful of website safety and potential advertisements when downloading free content. Always ensure a trusted source and consider using an ad-blocker for a smoother experience. These free options provide a wonderful starting point for any Paw Patrol coloring enthusiast!
Paid Coloring Page Resources: Are They Worth It?
While a wealth of free Paw Patrol coloring pages exist, paid resources offer distinct advantages for dedicated fans and educators. Platforms like Etsy and specialized coloring page websites often feature higher-quality designs, intricate details, and unique scenes not found in free options.
Paid packs frequently include themed collections – birthdays, holidays, or specific episodes – providing a curated coloring experience. These resources can also offer exclusive artwork and larger page sizes, enhancing the overall enjoyment. Furthermore, purchasing supports artists and creators.
However, consider your needs and budget. If occasional coloring is sufficient, free options are perfectly adequate. But for frequent use, detailed artwork, or specialized themes, investing in paid Paw Patrol coloring pages can be worthwhile, delivering a premium coloring experience.
Types of Paw Patrol Coloring Pages Available
Explore diverse Paw Patrol coloring pages, from character-focused designs to exciting scene depictions and festive holiday themes, offering endless creative possibilities!
Character-Specific Pages: Chase, Marshall, Skye & More
Dive into the individual worlds of each Paw Patrol pup with dedicated coloring pages! Chase, the German Shepherd police pup, often appears in action-packed scenes, perfect for bold color choices. Marshall, the Dalmatian firefighter, provides opportunities for vibrant reds and yellows, capturing his heroic spirit.
Skye, the cockapoo pilot, lends herself to bright blues and pinks, reflecting her aerial adventures. Rubble, the bulldog construction pup, is ideal for earthy tones and yellows, showcasing his building prowess. Rocky, the mixed-breed recycling pup, encourages creative use of greens and browns, promoting eco-consciousness.
Zuma, the Labrador water rescue pup, inspires shades of blue and orange, mirroring his aquatic rescues. Everest, the husky snow rescue pup, is fantastic for cool blues and whites, capturing the winter wonderland. These character-focused pages allow children to connect with their favorite pups on a personal level, fostering imagination and artistic expression.
Scene-Based Pages: Adventure Bay & Rescue Missions
Immerse yourselves in the bustling world of Adventure Bay with expansive scene-based coloring pages! These pages depict iconic locations like the Lookout, Farmer Yumi’s farm, and Katie’s Pet Parlor, offering a rich backdrop for creative coloring. Rescue missions are frequently featured, showcasing the pups working together to save the day.
Coloring these scenes allows children to recreate their favorite episodes or invent new adventures. Pages might illustrate a daring sea rescue with Zuma, a high-flying helicopter mission with Skye, or a thrilling fire rescue led by Marshall.
Detailed backgrounds and multiple characters provide a more complex coloring experience, encouraging attention to detail and storytelling. These pages aren’t just about coloring; they’re about bringing the entire world of Paw Patrol to life, fostering imagination and collaborative play.
Holiday-Themed Paw Patrol Coloring Pages
Celebrate seasonal festivities with adorable Paw Patrol holiday-themed coloring pages! These pages bring a festive cheer, featuring the pups enjoying Halloween, Christmas, Thanksgiving, and other special occasions. Expect to see Chase dressed as a pumpkin, Marshall with Santa hats, and the whole team decorating the Lookout for the holidays.
Coloring these pages adds a delightful touch to holiday preparations and provides a fun, creative activity for children. Many designs incorporate holiday symbols like snowflakes, ornaments, and presents, enhancing the festive atmosphere.
These themed pages are perfect for creating handmade cards, decorations, or simply enjoying a cozy coloring session during the holidays. They offer a unique way to combine a love for Paw Patrol with the joy of seasonal celebrations, making memories that will last.
Downloading and Printing Paw Patrol Coloring Pages (PDF)
Easily access and print Paw Patrol coloring pages in PDF format, ensuring high-quality images for vibrant coloring adventures and creative fun!
Ensuring PDF Compatibility and Quality
Prior to downloading, verify the PDF source is reputable to avoid compatibility issues or corrupted files. Most modern devices and operating systems natively support PDF viewing, but older systems might require a PDF reader like Adobe Acrobat Reader – a free download.
Check the file size; excessively small files may indicate low resolution, resulting in pixelated prints. Conversely, unusually large files aren’t necessarily better and could take longer to download. Preview the PDF, if possible, before fully downloading to assess image clarity and ensure the coloring pages are crisp and well-defined.
Look for PDFs created with standard PDF/A compliance for long-term archiving and reliable viewing across different platforms. A high-quality PDF will retain sharp lines and details, providing a superior coloring experience for children, allowing for intricate designs and vibrant color application.
Optimal Printing Settings for Best Results
To achieve the best possible prints of your Paw Patrol coloring pages, adjust your printer settings. Select “High Quality” or “Best” print quality in your printer dialogue box for sharper lines and more vibrant colors. Ensure your paper size setting matches the paper you’re using – typically US Letter (8.5 x 11 inches) or A4.
Disable any “Fit to Page” options, as this can distort the image. Instead, verify the scaling is set to 100% to maintain the original proportions of the coloring page. For color printers, choose a color profile appropriate for your paper type. A test print is always recommended to check color accuracy and image clarity before printing multiple copies.
Consider using borderless printing if your printer supports it, maximizing the printable area and creating a more immersive coloring experience.
Paper Types: Choosing the Right Material
Selecting the right paper significantly enhances the Paw Patrol coloring experience. Standard printer paper (20lb) is suitable for casual coloring with crayons or pencils, offering affordability and accessibility. For vibrant coloring with markers, consider using thicker paper, like 24lb or 28lb, to prevent bleed-through.
Cardstock (65lb or higher) provides a more durable surface, ideal for artwork intended for display or repeated use. Watercolor paper is excellent if your child enjoys using watercolors, resisting buckling and allowing for beautiful blending. Matte photo paper can also yield stunning results with markers, showcasing rich colors.
Experiment with different textures and weights to discover what best suits your child’s preferred coloring tools and artistic style.
Paw Patrol Coloring Page Activities & Ideas
Boost the fun with coloring contests, storytelling integration, and educational activities like color recognition and counting, all using Paw Patrol PDFs!
Coloring Contests and Challenges
Organizing coloring contests centered around Paw Patrol coloring pages is a fantastic way to spark creativity and friendly competition. Establish clear guidelines, such as age categories and judging criteria – neatness, color choices, and overall artistic expression.
Consider themed challenges, like “Best Rescue Scene” or “Most Creative Pup,” to further engage participants. Prizes can range from small Paw Patrol-themed toys to art supplies, encouraging enthusiastic participation.
To amplify the excitement, display the completed artwork in a designated area, allowing everyone to admire the colorful creations. Sharing the winning entries online, with parental permission, can also broaden the reach and celebrate the young artists’ talents. Remember to emphasize fun and participation over strict competition!
Combining Coloring with Storytelling
Elevate the coloring experience by weaving narratives around Paw Patrol coloring pages. Encourage children to invent stories about what’s happening in the scene they’re coloring, fostering imagination and language skills.
Prompt them with questions like, “What mission are the pups on?” or “What problem are they solving?” They can describe the characters’ feelings, the setting, and the events unfolding.
Alternatively, start a story and have the child continue it while coloring, adding details and plot twists. This activity transforms coloring from a solitary pursuit into an interactive, creative adventure. After coloring, have them retell the story, strengthening comprehension and verbal expression. It’s a delightful way to blend artistic expression with literary exploration!
Using Coloring Pages for Educational Purposes (Color Recognition, Counting)
Paw Patrol coloring pages offer fantastic opportunities for subtle learning! Utilize them to reinforce color recognition by asking children to identify and name the colors they’re using.
Introduce counting exercises by asking them to count specific elements within the image – how many trees, pups, or rescue vehicles are present?
Expand on this by requesting they color a certain number of objects a specific color. For example, “Color three clouds blue.” These pages can also aid in shape identification.
Furthermore, discuss positional words like “above,” “below,” and “beside” while referencing elements in the coloring page. It’s a playful way to integrate educational concepts into a fun, familiar activity, making learning enjoyable and effective!
Safety Considerations When Downloading PDFs
Prioritize online safety! Always scan downloaded Paw Patrol PDFs for viruses and ensure sources are reputable to protect your devices and children.
Avoiding Malicious Websites and Files
Navigating the internet for Paw Patrol coloring pages requires caution. Many websites offer free printables, but some may harbor malicious software disguised as harmless PDFs. Always prioritize downloading from well-known, trusted sources like official websites or reputable coloring page platforms. Be wary of sites with excessive pop-up ads or those requesting personal information before allowing a download.
Before opening any downloaded PDF, scan it with a reliable antivirus program. This crucial step can detect and remove potential threats, safeguarding your computer and personal data. Look for clear download buttons and avoid clicking on suspicious links. A legitimate site will typically offer a straightforward download process without unnecessary redirects or requests. Remember, a free coloring page isn’t worth compromising your online security!
Consider using a website reputation checker to assess the safety of a site before downloading anything. These tools provide insights into a website’s history and potential risks.
Parental Supervision and Online Safety
When children search for Paw Patrol coloring pages, parental involvement is paramount. Supervise their online activity to ensure they don’t stumble upon inappropriate content or risky websites. Discuss online safety rules with your child, emphasizing the importance of not clicking on unfamiliar links or downloading files without your permission. Explain that not everything online is trustworthy.
Actively monitor the websites your child visits and the searches they conduct. Utilize parental control software to block access to potentially harmful sites and set time limits for online usage. Encourage open communication; create a safe space for your child to report anything that makes them feel uncomfortable or scared. Remember, proactive guidance is key to a positive and secure online experience.
Reinforce the message that you are there to help and protect them while they enjoy their favorite characters.
Checking File Sizes and Sources
Before downloading any Paw Patrol coloring page PDF, carefully examine the file size. Unusually large or small file sizes can be a red flag, potentially indicating the presence of malware or unwanted software. Prioritize downloading from reputable websites known for providing safe and legitimate content, like established coloring page resources or official brand channels.
Always verify the source’s URL and look for security indicators like “https” in the address bar. Be cautious of websites with excessive advertisements or pop-ups. Scan downloaded files with a reliable antivirus program before opening them, even if the source seems trustworthy. Consider using a website reputation checker to assess the safety of the domain.
A little diligence can prevent potential security risks and ensure a worry-free coloring experience for your child.
Beyond Coloring: Expanding the Paw Patrol Fun
Enhance the Paw Patrol experience with exciting games, engaging toys, and captivating episodes, building upon the creativity sparked by coloring page PDFs!
Paw Patrol Games and Activities
Complementing the artistic enjoyment of Paw Patrol coloring pages, a diverse range of games and activities further immerse children in the world of Adventure Bay. Consider a “Paw Patrol Rescue Mission” activity, mirroring the show’s themes of teamwork and problem-solving. This could involve creating an obstacle course, hiding “rescue” items, or devising a scenario requiring collaborative effort.
After coloring, children can share their experiences and colored characters, celebrating their successes with a small reward or a favorite Paw Patrol episode. Interactive games, both digital and physical, extend the fun beyond the page. Simple hide-and-seek, themed scavenger hunts, or even building structures with blocks inspired by the show’s locations can provide hours of entertainment. These activities reinforce the positive messages of the series and encourage imaginative play, building upon the creativity initiated with the coloring pages.
Paw Patrol Toys and Merchandise
Expanding the Paw Patrol experience beyond coloring pages, a vast array of toys and merchandise offers tangible connections to the beloved characters. From action figures and plush toys representing Chase, Marshall, Skye, and the entire pup team, to vehicle playsets recreating Adventure Bay, children can actively engage in imaginative role-playing.
These toys often complement coloring activities, inspiring scenes and narratives that translate directly onto the page. Consider incorporating toy vehicles into storytelling while coloring a scene-based page. Beyond toys, merchandise like clothing, backpacks, and bedding further immerse children in the Paw Patrol universe. Collecting these items can enhance the overall enjoyment and foster a deeper connection with the show, extending the creative spark ignited by coloring into a broader, playful lifestyle.
Watching Paw Patrol Episodes & Movies
Complementing the creative outlet of Paw Patrol coloring pages, watching the episodes and movies provides rich visual inspiration and reinforces character recognition. Observing the pups in action – their rescue missions, teamwork, and problem-solving skills – fuels imaginative play and translates beautifully onto the coloring page.
Children can recreate favorite scenes while coloring, deepening their understanding of the storylines and character dynamics. The show’s vibrant animation and engaging narratives offer a wealth of detail to incorporate into their artwork. Watching Paw Patrol also sparks storytelling opportunities, encouraging kids to narrate their coloring creations and invent new adventures for Ryder and his team. This synergistic approach – coloring and viewing – maximizes engagement and fosters a love for the Paw Patrol universe.